A painted office accent wall is a realistic one-day DIY project. A wood slat or moulding wall takes a weekend. A custom acoustic or integrated brand wall with AV routing requires several days and often the help of a professional. Material costs vary notably by method, with painted walls costing the least and acoustic or specialty systems the most.
Your first three decisions before touching a wall:
- Which wall? Pick one. The wall behind your desk, the conference room focal wall, or your video call background.
- Which method? Paint, moulding/geometric, wood slat, or acoustic panel.
- Measure it. Width, height, and note any outlets, switches, or HVAC vents.
That’s the whole project in miniature. The rest of this guide walks you through each step in detail.
Key Takeaways
A painted office accent wall is a realistic one-day DIY project for $50–$150 in materials; acoustic and custom geometric walls require professional installation when they involve concealed services or fire-rated specifications.
| Point | Details |
|---|---|
| Choose one wall deliberately | Pick the wall behind your desk, the conference focal wall, or your video background — never two walls in the same room. |
| Match method to skill and budget | Paint costs $50–$150 and takes one day; slat and moulding walls run $150–$600 and take one to two days. |
| Test color under real lighting | Paint two 12×12-inch swatches on the wall and observe them at morning, midday, and evening before committing. |
| Hire a pro for concealed services | Electrical, AV routing, fire-rated acoustic panels, and client-facing finishes are worth the professional install cost. |
| Expressions Remodeling | Offers carpentry, finish work, and complimentary 3D design previews for St. Louis homeowners and office projects. |
Table of Contents
- How does accent wall installation work in an office?
- What materials and tools do you need for each method?
- Step-by-step installation for each office accent wall method
- How does color affect productivity in an office?
- What does a DIY office accent wall cost and how long does it take?
- Common mistakes and how to maintain your accent wall
- When should you DIY vs. hire a professional?
- Expressions Remodeling handles the projects DIY can’t
- Sources
How does accent wall installation work in an office?
The term “accent wall” encompasses simple paint applications to complex wood slat systems with integrated lighting. In offices, finishes must withstand daily traffic, appear professional on video calls, and support the room’s purposes.
2026 office design trends point toward wellness-oriented palettes, acoustic planning, and using accent walls to zone space rather than wallpapering a room in brand color. That shift matters for how you choose your wall and your method.
Which wall should you pick?
The wall behind your primary desk chair is the default choice for home offices because it anchors the space and frames you on video calls. In a conference room, the wall opposite the door often serves as a natural focal point. Reception areas typically use the wall facing incoming visitors.
A few rules that hold across all office types:
- One wall only. Two accent walls in a single room compete for attention and make the space feel smaller.
- Match scale to ceiling height. A full-height vertical slat treatment on a 9-foot ceiling reads clean; the same treatment on a 7.5-foot ceiling can feel oppressive.
- Check sightlines. Stand at the room’s entry point and identify what you actually see. That’s your accent wall candidate.
- Audit your video background. If the wall will appear on calls, test it on camera before committing. High-contrast patterns can create visual noise on compressed video.
- Consider traffic. A wall in a high-traffic corridor needs a more durable finish than a wall behind a desk that nobody touches.
Design guidance from WorkDesign recommends using accent walls to zone by function: calming tones in focus areas, slightly more energetic tones in collaboration zones. That’s a more useful frame than picking a color because it looked good on a phone screen.
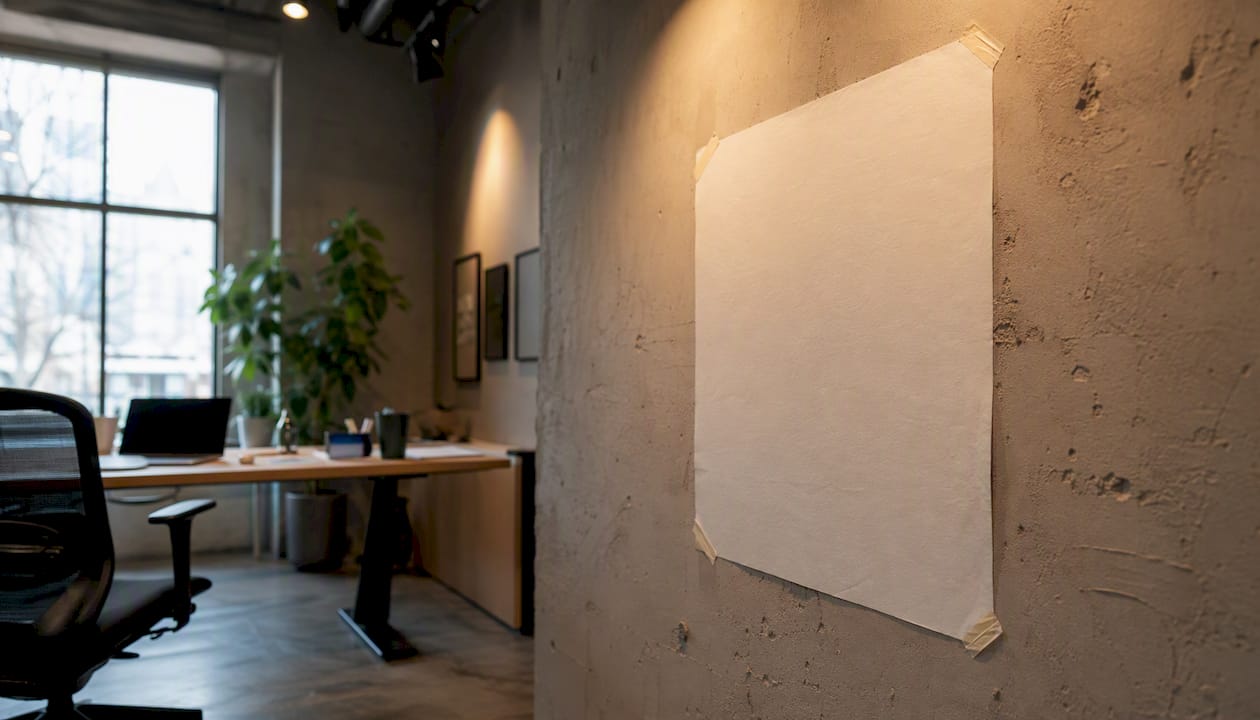
Pro Tip: Before ordering a single can of paint or a single slat, tape a large sheet of white paper to the wall and observe it across the full day. Morning light, afternoon sun, and your artificial lighting all read differently. That paper test costs nothing and saves you from a color you’ll regret by 3 PM.
What materials and tools do you need for each method?
The shopping list changes significantly depending on which method you choose. Here’s a breakdown by approach, followed by a cost table.
Paint accent wall
Materials: Interior latex paint (eggshell or satin for offices; flat shows every scuff), primer, painter’s tape (Frog Tape or 3M ScotchBlue), drop cloths, plastic sheeting for furniture.
Tools: 9-inch roller with 3/8-inch nap, angled brush (2.5-inch), roller tray, extension pole, putty knife for any wall repairs.
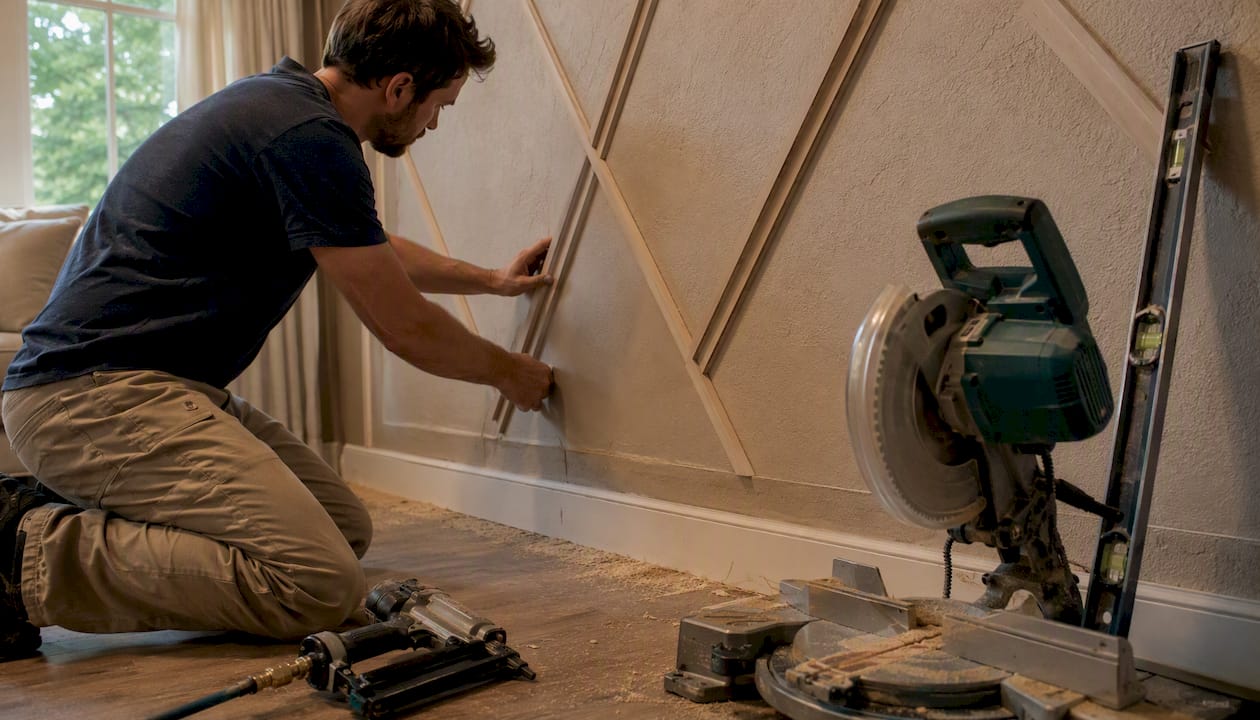
Moulding/geometric wall
Materials: MDF or solid wood trim pieces, construction adhesive (Liquid Nails), finishing nails, wood filler, sandpaper (120 and 220 grit), primer, paint.
Tools: Miter saw or miter box, nail gun (or hammer and nail set), level, tape measure, pencil, caulk gun.
Wood slat/panel system
Materials: Pre-milled wood slats or MDF slat panels, mounting rails or furring strips, wood screws, wood glue, stain or clear finish, sandpaper.
Tools: Table saw or circular saw, drill, level, stud finder, tape measure, clamps.
Acoustic/brand wall
Materials: Fabric-wrapped acoustic panels (Class A fire-rated for commercial spaces), Z-clips or impaling clips for mounting, cable management conduit if routing AV.
Tools: Drill, level, stud finder, wire stripper (if routing power), measuring tape.
Safety PPE for all methods: Safety glasses, dust mask (N95 for sanding MDF), knee pads for floor-level work, and non-slip footwear. Cover floors with canvas drop cloths — not plastic, which is a slip hazard.
Lowe’s installation guidance confirms the core sequence: measure, cut, install trim or panels, apply finishing nails, caulk, and paint. That order holds whether you’re doing a simple moulding grid or a full slat system.
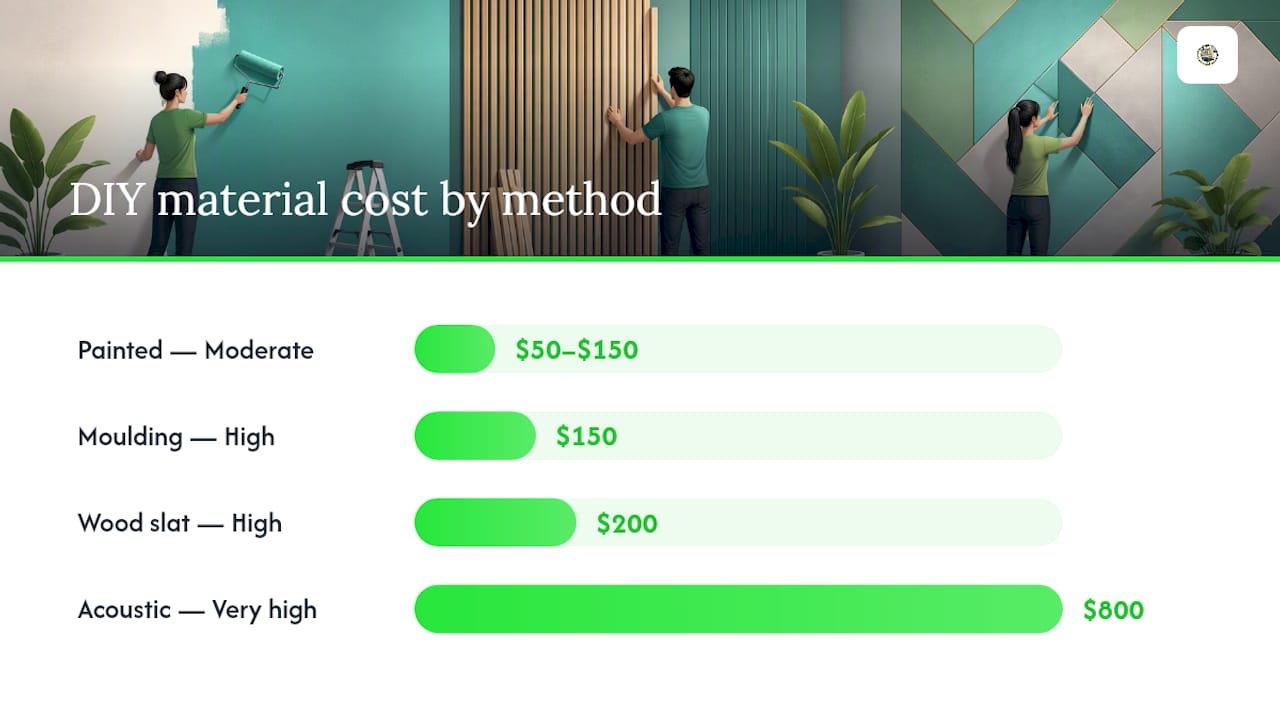
Rough DIY material cost by method
| Method | Typical DIY material cost | Finish durability |
|---|---|---|
| Painted accent wall | $50–$150 | Moderate (touch-up needed in high-traffic areas) |
| Moulding/geometric wall | $150 | High (painted MDF holds well) |
| Wood slat/panel system | $200 | High (sealed wood resists daily contact) |
| Acoustic/brand wall | $800 | Very high (contract-grade fabric panels) |
For commercial spaces, Gebesa’s 2026 office design guidance recommends specifying contract-grade finishes and testing materials under expected traffic before full installation. That’s worth noting if you’re outfitting a leased office rather than a home workspace.
Step-by-step installation for each office accent wall method
Every method follows the same high-level workflow: measure → prep the surface → install substrate or trim → finish (prime, paint, stain, or seal) → protect and test. The details differ by method.
Painted accent wall
- Measure and mark. Measure the wall’s width and height. Note all outlets, switches, and vents.
- Prep the surface. Fill any holes with spackle, sand smooth, and wipe the wall with a damp cloth. Let it dry completely.
- Tape edges. Apply painter’s tape along the ceiling line, baseboards, and adjacent walls. Press the tape edge firmly with a putty knife to prevent bleed.
- Prime. Roll one coat of primer, cut in the edges with a brush. Let it dry per the manufacturer’s time (typically 1–2 hours).
- Cut in the color. Use your angled brush to paint a 2–3 inch band along all taped edges before rolling.
- Roll the field. Work in a W pattern, overlapping each pass by about 50%. Two coats are standard; let the first dry fully before the second.
- Remove tape. Pull tape at a 45-degree angle while the final coat is still slightly tacky to get a clean edge.
- Test on camera. Before calling it done, check the color on your video call software under your actual office lighting.
Moulding/geometric wall
- Plan the grid on paper first. Sketch the wall to scale and decide on rectangle or square proportions. A common rule: keep moulding rectangles roughly 1.5x taller than wide for a classic look.
- Mark the layout on the wall. Use a level and pencil to mark all horizontal and vertical lines. A laser level (rentable at most hardware stores) saves significant time here.
- Cut trim pieces. Miter corners at 45 degrees. Cut all pieces for one rectangle before moving to the next.
- Attach trim. Apply a thin bead of construction adhesive to the back of each piece, press to the wall, and secure with finishing nails every 12–16 inches.
- Fill and sand. Fill nail holes and all seams with wood filler. Sand smooth when dry.
- Caulk joints. Run a thin bead of paintable caulk along every seam where trim meets the wall. Smooth with a damp finger.
- Prime and paint. Prime the trim and wall together for a unified finish. Two coats of paint in the same sheen.
Pro Tip: Cut a paper template of your first rectangle and tape it to the wall before cutting any wood. Live with it for a day. Proportions that look right on paper sometimes feel off at full scale in the actual room.
Wood slat/panel system
- Locate studs. Mark stud locations across the full wall width. Slat systems need solid backing.
- Install horizontal mounting rails (furring strips). Space them 16–24 inches apart vertically, screwed into studs. Check each rail for level.
- Determine slat spacing. A 1/4-inch to 1/2-inch gap between slats is standard. Tighter gaps read more formal; wider gaps show more of the wall behind and can be used to introduce a contrasting color.
- Pre-finish slats. Stain or seal slats before mounting — it’s far easier than finishing them in place.
- Mount slats. Attach each slat to the rails with wood screws from the back, or use a brad nailer from the face and fill the holes. Start from the bottom and work up.
- Leave a 1/4-inch gap at the floor and ceiling for ventilation and seasonal wood movement.
- Final finish pass. Touch up any visible fastener holes and apply a final coat of finish.
Vertical slat walls add perceived height and provide subtle acoustic diffusion in open-plan offices — a practical double benefit that pure paint can’t match.
Acoustic/brand wall
- Map the wall and plan panel layout. Acoustic panels typically come in 2×4-foot or 4×4-foot sizes. Lay out the arrangement on paper, accounting for any AV equipment, power outlets, or display screens.
- Install mounting hardware. Z-clips or impaling clips attach to the wall at stud locations. Follow the panel manufacturer’s weight ratings.
- Route any AV or power conduit first. If panels will conceal cables, run conduit before mounting panels. This step requires an electrician if it involves new circuits.
- Mount panels. Hang panels on clips, checking level as you go. Leave a small gap between panels for a clean reveal line.
- Test acoustics. Clap sharply in the room and listen for flutter echo. Adjust panel placement if needed before finalizing.
For commercial spaces, specify Class A fire-rated panels. This is non-negotiable in leased offices and most commercial building codes.
How does color affect productivity in an office?
Color is not decoration in a workspace. A controlled immersive VR study with 60 participants found that chromatic wall schemes measurably influence both productivity and emotional state. Green was associated with lower productivity compared to other colors tested. Blue and yellow produced higher positive affect, though the study also noted a weak negative correlation between those hues and productivity in some conditions. The researchers flag collinearity between hue and luminance as a confounding factor and recommend cautious generalization.
What that means practically: no single color is universally “best,” but the research does suggest that hue choice is worth deliberate thought rather than a gut-feel decision.
Some working rules for office accent walls:
- Blues and blue-greens tend to support focused, analytical work. They’re a reasonable default for private offices and conference rooms.
- Yellow and warm neutrals read as energizing and are better suited to collaboration areas or reception spaces where you want visitors to feel welcomed.
- Saturated reds were associated with higher negative affect in the study. Use red as an accent within an accent (a piece of art, a trim detail) rather than as the dominant wall color.
- Luminance matters as much as hue. A very dark navy and a very light sky blue are both “blue” but will read completely differently under fluorescent office lighting.
Layered lighting with high-CRI bulbs show colors more accurately and reduce the color shift that makes a paint chip look nothing like the finished wall. If your office runs on cool fluorescent tubes, test your paint sample under those exact tubes before committing.
To run a quick on-site test: paint two 12×12-inch swatches directly on the wall (not on cardboard), observe them at 9 AM, noon, and 5 PM, and check them on a video call. That 20-minute process has saved more accent wall projects than any color theory chart.
What does a DIY office accent wall cost and how long does it take?
Timeline and cost by method
Professional install estimates, which include labor and materials, vary notably by region, wall size, and finish complexity, with some mid-size markets having relatively lower costs.
When to hire a pro
DIY works well for painted walls, simple moulding grids, and pre-fabricated slat panel systems. Hire a professional when:
- The wall involves concealed electrical, AV routing, or data cabling. This requires a licensed electrician in most jurisdictions.
- You need fire-rated acoustic panels for a commercial lease. Installation errors can void fire ratings.
- The design involves complex geometry (herringbone, diagonal patterns, curved walls) where measurement errors compound.
- The space is client-facing and high-visibility and a DIY finish quality won’t meet the standard the room demands.
- You’re working against a tight deadline — a professional team can complete most accent walls in one to three business days.
For a small-space home office renovation, the decision often comes down to finish quality and time. A hired installer brings tools, experience, and the ability to fix problems before they become permanent.
Common mistakes and how to maintain your accent wall
Installation mistakes and fixes
- Paint bleed under tape. Usually caused by tape that wasn’t pressed firmly at the edge. Fix: let the paint dry, then score the tape line with a utility knife before pulling. Touch up with a small brush.
- Uneven slat spacing. Happens when you eyeball gaps instead of using a spacer. Cut a scrap piece of wood to your target gap width and use it as a physical spacer for every slat.
- Misaligned moulding grid. A single off-level piece throws the whole grid. Fix: remove the piece while the adhesive is still workable (within 15–20 minutes for most construction adhesives), re-mark, and reinstall.
- Squeaky or loose panels. Usually a fastener that missed the stud or a rail that wasn’t fully secured. Re-drive screws into solid backing; don’t just add more fasteners in the same location.
- Glare on video calls. High-sheen paint reflects light directly into the camera. Sand the wall lightly and apply a flat or eggshell topcoat.
Maintenance checklist
- Painted walls: Touch up scuffs with the original paint (keep a labeled quart in storage). Wash with a damp cloth and mild soap; avoid abrasive cleaners on eggshell finishes.
- Wood slat/moulding walls: Check fasteners annually. Re-drive any that have worked loose. Re-apply finish to any areas showing wear, especially near floor level.
- Acoustic panels: Vacuum fabric surfaces with a brush attachment every few months. Replace panels with visible staining that won’t clean out — most manufacturers sell individual replacement panels.
Protecting the office during installation
Cover all flooring with canvas drop cloths before any cutting or painting begins. Move furniture at least 4 feet from the work wall. Tape plastic sheeting over any equipment that can’t be moved. If the office is occupied, schedule installation work for off-hours or a weekend to minimize disruption. Sanding MDF produces fine dust that settles on everything — seal the room with plastic sheeting across the doorway and run a box fan exhausting out a window.
For refreshing a space without a full renovation, an accent wall is one of the highest-impact, lowest-disruption options available. The key is preparation: a well-prepped room takes half the cleanup time of an unprepared one.
When should you DIY vs. hire a professional?
Most painted and simple slat accent walls are achievable for careful DIYers over a weekend. Achieving professional-level finish quality mainly requires patience through thorough preparation, applying two coats, and clean taping.
Where that calculus shifts is complexity and consequence. A geometric moulding wall with 45-degree miters across 14 feet of wall requires a miter saw, a good eye, and the willingness to recut pieces that don’t fit. A wood slat system on a wall with multiple outlets requires planning around each box. Neither is impossible for a motivated DIYer, but both have a real failure mode that’s expensive to fix after the fact.
The projects I’d consistently recommend hiring out: anything involving concealed services (electrical, AV, data), fire-rated acoustic installations in commercial leases, large-scale brand rollouts across multiple rooms, and any wall in a client-facing space where the finish has to be flawless. A visible seam or a paint bleed in a conference room that clients see every week is a different problem than the same flaw in a home office.
Red flags that should push you toward a professional:
- You need to move or add electrical outlets or switches
- The wall has existing damage (water staining, soft drywall, previous tile removal) that needs structural repair first
- Your building’s lease requires landlord approval and contractor certification for modifications
- The project has a fixed deadline with no buffer for mistakes
- The space will be photographed or filmed professionally
If you’re in St. Louis and any of those apply, have your wall dimensions and a few reference photos ready before you call. That preparation cuts the estimate conversation in half.
Expressions Remodeling handles the projects DIY can’t
When the accent wall project is straightforward, this guide gives you everything you need. When it isn’t — when the wall needs electrical work, when the finish has to be client-ready, or when you want to see the design before a single nail goes in — that’s where Expressions Remodeling earns its keep.
Expressions Remodeling serves homeowners and small-business owners in St. Louis, MO with carpentry, interior finish work, acoustic panel installation, lighting coordination, and full design-to-build project management. The difference from hiring a handyman is the complimentary 3D design preview — you see exactly what the finished wall looks like before any work begins, which eliminates the guesswork on color, proportion, and material choice.
Before reaching out, prepare: wall dimensions (width and height), photos of the existing space, two or three reference images of styles you like, and a rough budget range. That’s enough to get a useful first conversation and a free estimate. View the full interior design and carpentry services to see what’s in scope, or go straight to pricing guidance if budget is your first question.
Sources
- PMC article: IVR study on color and productivity (full experimental report)
- The power of paint: leveraging color psychology to enhance culture, productivity, and profit — WorkDesign (2025-09-19)
- Office Interior Design Trends in 2026 — Vistaar Designs
- Office Design Trends 2026: Colors & Materials for US Workspaces — Gebesa blog
- Office Accent Wall Ideas Orlando: 2026 Professional Design Guide — The Awesome Painting Services