
Pick the right vanity by measuring the people who will use it and the room it goes in, choosing the sink first, then matching height, width, depth, and countertop to those numbers. Skipping straight to style leads to the two most common complaints: a counter that is too low for taller household members and a cabinet that blocks the door. Get the measurements and the sink type locked in first, and the rest of the decision gets much easier.
TL;DR:
- Ensure the vanity height is based on measuring elbow height for all household users and plan for the middle of the range rather than extremes.
- Verify the room’s wall length, door swing, and unobstructed floor space to prevent installation conflicts and meet planning guidelines.
- Choose sink type first, as it determines cabinet and countertop options, and coordinate faucet and bowl height for vessel sinks to prevent splashing.
- Select countertop materials like quartz or granite for durability and low maintenance, depending on your willingness to reseal or clean regularly.
- Confirm that plumbing rough-ins and wall blocking are planned before ordering to avoid costly modifications or installation delays.
Table of Contents
- Measure People and the Room Before You Shop
- Vanity Height, Width, and Depth: Standards, Comfort, and Accessibility Trade-Offs
- How Sink Type Changes Your Cabinet and Countertop Choice
- Countertop Materials: Durability, Maintenance, and What to Avoid
- Storage and Functionality: Drawers, Doors, and Organizers
- Installation and Plumbing: Freestanding vs. Wall-Mounted
- How to Choose: A Compact Checklist You Can Follow Now
- Practical Traps We See in Remodels
- How We Help You Get the Vanity Right the First Time
- FAQ
- Sources
Measure People and the Room Before You Shop
Before you look at a single vanity, measure the humans. Have each adult or regular user stand straight with arms relaxed, then measure from the floor to the point where the elbow bends. That number tells you the comfortable counter height for handwashing and grooming, and it varies more between household members than most people expect.
Then measure the room itself:
- Wall length available for the vanity, including any trim or baseboard that eats into it
- Door swing path, so the cabinet or an open drawer doesn’t collide with it
- Distance to the nearest fixture (toilet, tub, shower) for clearance
- Clear floor space in front of the sink location
- Ceiling height only if you’re considering tall storage towers above the vanity
Measure the finished floor level, not the subfloor, since tile or vinyl adds height that changes your final clearance. A common mistake is measuring before flooring goes in and ordering a vanity that sits an inch lower than planned once the new floor is down.
A simple mock-up helps more than a tape measure alone. Put a strip of tape on the wall at your proposed counter height, or stack a crate or box to that height, and stand at it for a minute the way you would brush your teeth. If your back hunches or your wrists bend awkwardly, adjust before you order anything.

Pro Tip: Measure every regular user in the household, not just the tallest adult, and plan around the middle of the range rather than the extremes.
Vanity Height, Width, and Depth: Standards, Comfort, and Accessibility Trade-Offs
Vanity height comes in three practical bands. Traditional height sits around 30 to 32 inches, which matches older homes and works well for children or shorter users. Comfort height runs 34 to 36 inches and has become the more common choice in new installs because it reduces back strain for most adults. Accessible height follows a stricter rule: the rim or counter surface must be no more than 34 inches above the finished floor, per the Access Board’s lavatory specifications, along with defined knee and toe clearance underneath.
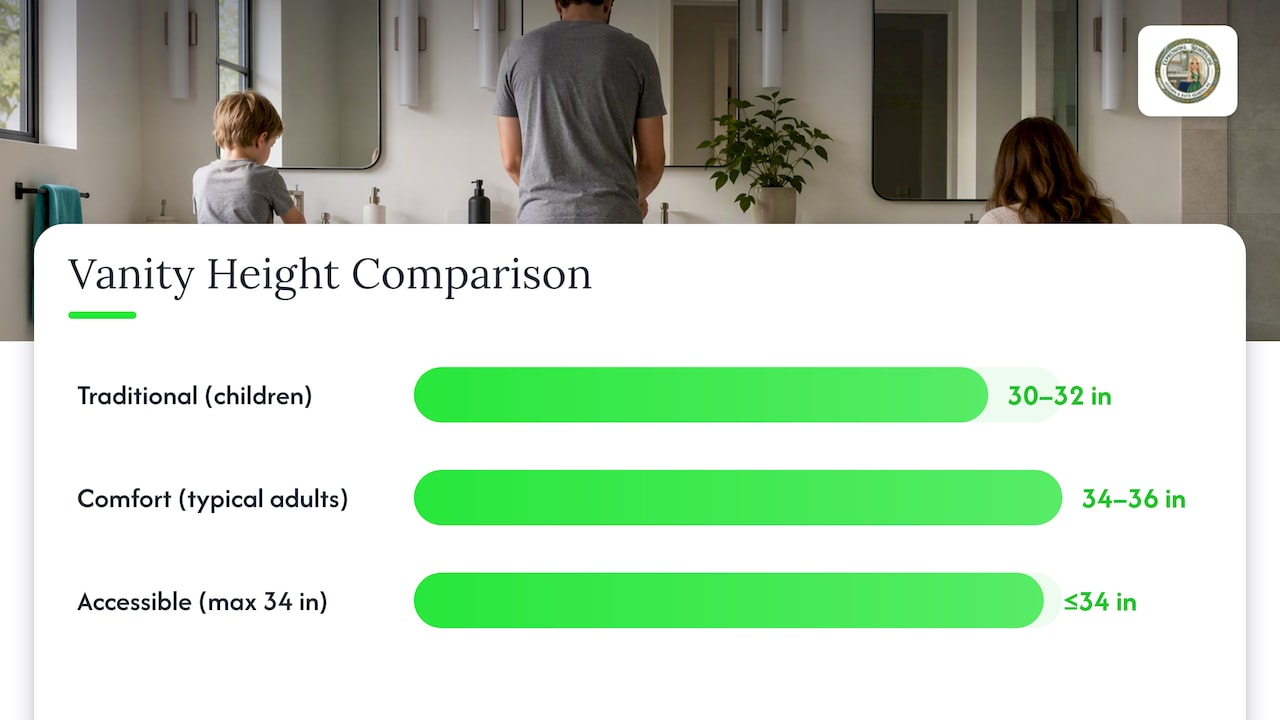
For mixed households, comfort height with a step stool for younger kids usually beats building to the shortest user’s needs.
Clearances matter as much as height. NKBA planning guidance recommends at least 30 by 48 inches of clear floor space at each fixture, and accessible designs may need 48 to 52 inches of work-zone clearance with 60 to 67-inch widths where a wheelchair needs to maneuver. The Access Board’s accessible lavatory specs also call for 17 to 25 inches of knee and toe space depth and a 30-inch minimum knee width for forward approach.
Width and depth follow from sink count and available wall space:
- A single-sink vanity typically needs 24 to 36 inches of width to avoid feeling cramped
- A double-sink vanity generally needs 60 inches or more so the bowls don’t crowd each other
- Standard depth runs 20 to 21 inches; shallower units around 18 inches suit tight powder rooms but sacrifice storage
How Sink Type Changes Your Cabinet and Countertop Choice
The sink you pick first determines a lot of what comes after it, which is why choosing sink before cabinet saves rework. Vessel sinks sit on top of the counter rather than into it, which raises the effective rim height by several inches. That often means choosing a lower cabinet height than you’d use with a standard sink, and it changes where a mirror or sconce needs to sit since your eye level shifts relative to the bowl.
Undermount sinks attach beneath the counter and need a polished edge detail on the cutout, along with careful plumbing alignment underneath since there’s no lip to hide minor misalignment. Integrated sinks, where the bowl and counter are one molded piece, simplify cleaning but limit your material choice to whatever the integrated unit is made from, usually solid surface or quartz composite.
- Drop-in sinks rest into a cutout with a visible rim, the simplest to install and replace
- Trough sinks let you serve two faucets from one long basin, useful for saving width on a double-vanity wall
- Faucet spout centerline should generally align with the bowl’s drain center to avoid splashing against one side
Vessel sinks in particular need faucet height coordinated with bowl height so the spout clears the rim without spraying water outside the basin.
Countertop Materials: Durability, Maintenance, and What to Avoid
Countertop material decisions come down to how much maintenance you’re willing to do and how the surface will hold up to daily splashing, hair products, and cleaning chemicals. Consumer Reports’ countertop testing finds quartz performs strongly against stains and needs no sealing, which makes it a dependable default for a bathroom that gets heavy daily use. Granite resists abrasion and heat well but needs occasional resealing to keep its stain resistance up. Marble, limestone, and concrete are more prone to staining and scratching in bathroom settings, where cosmetics, mouthwash, and hair dye sit on the surface more often than in a kitchen.
Quartz and ultracompact surfaces show strong long-term value for bathroom vanities because they resist stains without needing sealant, according to Consumer Reports material testing. That matters more in a bathroom than a kitchen, since heavy cookware impact isn’t a factor but chemical exposure is constant.
- Quartz: low maintenance, no sealing required, wide color range
- Granite: durable and heat resistant, benefits from periodic resealing
- Laminate: budget-friendly, lighter duty, prone to chipping at edges over time
- Solid surface: seamless with integrated sinks, moderate scratch resistance
- Marble or concrete: attractive but higher maintenance, best avoided without committing to regular sealing
Undermount sinks pair well with quartz or granite since the polished edge holds up over years of use. Integrated and vessel sinks work best with solid surface or quartz composite, since those materials mold cleanly around the bowl shape without a visible seam.
Storage and Functionality: Drawers, Doors, and Organizers
Drawers beat cabinet doors for anything you reach for daily, since you can see and grab items without crouching. A shallow top drawer around 4 to 6 inches deep suits toiletries and small items, while a deeper lower drawer handles folded towels or hair tools.
- Cabinet doors still make sense for bulky items like a trash can or cleaning supplies stored upright
- Corner units and pull-out organizers recover otherwise wasted space in an L-shaped layout
- Open shelving works for display towels but exposes everything to splash and dust
Plan outlet placement before the cabinet arrives, since a vanity with internal drawer outlets for a hair dryer or electric toothbrush charger needs an electrician involved early, not after cabinets are set. If you’re skipping a medicine cabinet, make sure the vanity drawers have room for what used to live behind that mirror.
Installation and Plumbing: Freestanding vs. Wall-Mounted
- Decide early whether you want a freestanding vanity or a wall-mounted floating one, because floating vanities need blocking or a carrier system installed inside the wall before drywall goes up. Retrofitting blocking after the wall is finished is expensive and sometimes impossible without opening it back up.
- Confirm plumbing rough-in locations match your chosen sink layout. Moving a drain or supply line even a few inches adds plumbing labor and can push back your installation timeline by days.
- Hold off on final cabinet and countertop measurements until after flooring and wall finishes are complete. A template taken too early misses the true finished-floor height and wall thickness, and Consumer Reports’ countertop guidance recommends fabricators measure only after those finishes are in place.
Also check the door swing against your new cabinet footprint, especially in smaller bathrooms where a vanity a few inches deeper can clip a swinging door; reviewing interior door clearance options can help avoid exactly that conflict. If you’re replacing the bathroom door during the same project, it’s worth reviewing interior door clearance options designed to avoid exactly that conflict.
Pro Tip: Ask your contractor to confirm blocking and rough-in locations before you order the vanity, not after it arrives.
How to Choose: A Compact Checklist You Can Follow Now
- Measure elbow height for every regular household user and take the middle of the range
- Measure wall length, door swing, and clear floor space in the bathroom
- Choose sink type first (undermount, vessel, integrated, drop-in, or trough)
- Pick a height band: standard, comfort, or accessible based on who uses the room
- Match width and depth to sink count and available wall space
- Select countertop material based on maintenance tolerance, not just color
- Decide freestanding or wall-mounted, and confirm blocking is planned if floating
- Confirm plumbing rough-in location matches your sink layout
- Mock up the counter height with tape or a crate before finalizing
- Get final measurements and a written template confirmation before the countertop is fabricated
| Decision point | What to verify | Why it matters |
|---|---|---|
| Elbow height | Measured for all regular users | Sets comfortable counter height |
| Clear floor space | At least 30 by 48 inches at the fixture | Matches NKBA planning guidance |
| Accessible lavatory height | 34 inches maximum to rim or counter | Required for accessible design per the Access Board |
| Countertop fabrication | Measured after flooring is installed | Prevents a misfit top |
The single most important verification before you order a countertop is confirming the fabricator measured after your finished flooring was installed, not from the architect’s plans or an early site visit.
Practical Traps We See in Remodels
The height mismatch is the most common fix we make: someone orders a standard-height vanity after living with a taller one, or vice versa, without remeasuring. Missing blocking for a floating vanity and plumbing rough-ins that don’t match the new sink layout cause the other two recurring headaches. Coordinating measurements, templates, and final install sequencing before ordering anything is exactly why hiring a professional pays off on a project with this many interdependent steps.
— Kierin
How We Help You Get the Vanity Right the First Time
We handle bathroom remodeling from measurement through final installation, so the sink, cabinet, countertop, and plumbing decisions get made in the right order instead of guessed at separately. A consultation with us covers your household’s measurements, sink preference, and material goals before anything gets ordered.
- We measure elbow height and room clearances before recommending a vanity height band
- We coordinate blocking and plumbing rough-in timing so nothing gets installed twice
- We confirm final templates only after flooring is in place
Full bathroom remodeling with us starts at $16,999 per project. If you’re ready to talk through your layout, request an estimate and we’ll walk through the measurements with you before anything is ordered.
FAQ
What is the current trend for bathroom vanities?
Floating or wall-mounted vanities with clean lines and mixed materials, such as wood-look cabinetry paired with stone or quartz tops, remain a popular direction for a lighter, more open look. Double-sink layouts and furniture-style cabinets with exposed legs are also common choices in current remodels.
What color bathroom vanity never goes out of style?
White and warm wood tones are the most consistently recommended colors for long-term appeal, since they pair easily with changing hardware, tile, and wall colors. Neutral gray cabinetry has also held up well as a timeless option in recent years.
What makes a bathroom look tacky according to designers?
Mismatched hardware finishes, a vanity sized wrong for the room, and countertop or cabinet materials that clash with the tile are frequent complaints. Clutter on the counter and poor lighting placement around the mirror also make an otherwise good design feel off.
Which is better for my bathroom, a pedestal sink or a small vanity sink?
A pedestal sink saves visual space in a tiny bathroom but offers no storage underneath, while even a shallow vanity sink gives you drawer or cabinet space for daily items. For most homeowners, a small vanity is the more functional choice unless floor space is extremely limited.