Basement finishing best practices are defined by three non-negotiable pillars: moisture control, proper permitting, and moisture-resistant materials. Skip any one of them and you risk mold, failed inspections, and a remodel that actually hurts your resale value. A properly permitted and sequenced basement finish can add 65%–80% of its cost to resale value. That return disappears fast when unpermitted work surfaces during a home sale. The ANSI Z765 standard governs how appraisers value finished basements, and knowing that standard before you break ground changes every decision you make.
1. Basement finishing best practices start with moisture testing
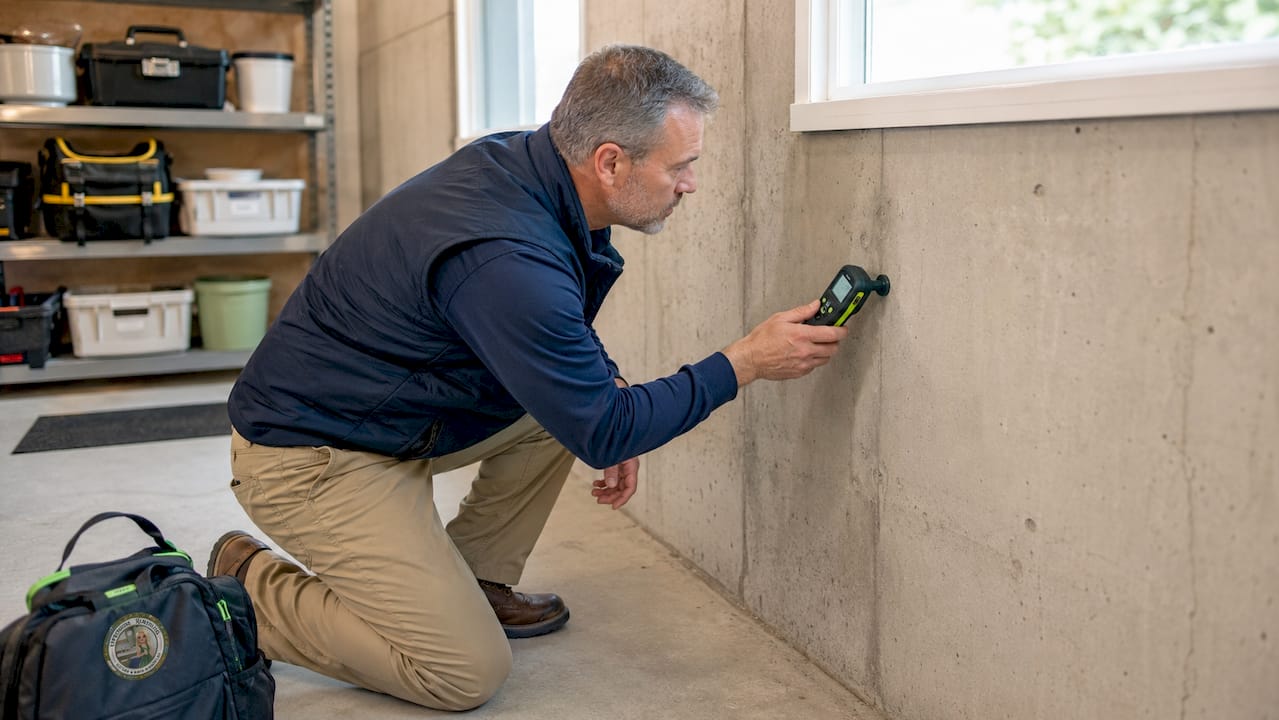
Moisture is the single biggest threat to any finished basement. Before you frame one wall or hang one sheet of drywall, you need to know exactly what you are dealing with below grade.
The most reliable DIY test is the plastic sheet method. Tape a 12-inch by 12-inch piece of plastic sheeting directly to the concrete floor and walls. Seal all four edges with tape and leave it for 48 hours. Moisture on the underside of the plastic means water is migrating through the concrete itself. That is a foundation-level problem that requires waterproofing before any finishing work begins.
Common moisture mistakes homeowners make:
- Skipping the plastic sheet test and assuming the basement is dry
- Patching visible cracks without addressing hydrostatic pressure behind the wall
- Installing finishes over a damp slab without a vapor barrier
- Ignoring seasonal water intrusion that only appears after heavy rain
Pro Tip: Test for radon at the same time you test for moisture. Radon mitigation systems are far cheaper to install before framing than after. Many St. Louis homes sit in EPA Zone 1 or Zone 2 radon areas, making this step especially relevant.
2. Secure permits before any work begins
Permits are not optional paperwork. They are the legal record that your basement was built to code, and they protect you in two critical ways: homeowners insurance coverage and resale value.
Permit costs typically run $500–$2,000 depending on your municipality and project scope. That cost is minor compared to the liability of unpermitted work. Buyers and their agents routinely pull permit histories. Missing permits can kill a sale or force you to tear out finished walls for a retroactive inspection.
The correct permit sequence for a basement finish looks like this:
- Pull building, electrical, and plumbing permits before any rough-in work
- Schedule rough-in inspections for framing, electrical, and plumbing before drywall goes up
- Pass all rough-in inspections, then hang drywall
- Schedule a final inspection after all finishes are complete
Pro Tip: Submit permit applications two to three weeks before your planned start date. Permits add one to three weeks to a project timeline. Building that buffer into your schedule prevents costly delays when subcontractors are already booked.
3. Frame correctly to prevent moisture problems
Framing directly against concrete is one of the most common and costly mistakes in basement finishing. Concrete is porous. When a wood stud touches concrete, moisture transfers directly into the wood, leading to rot and mold behind your finished walls.
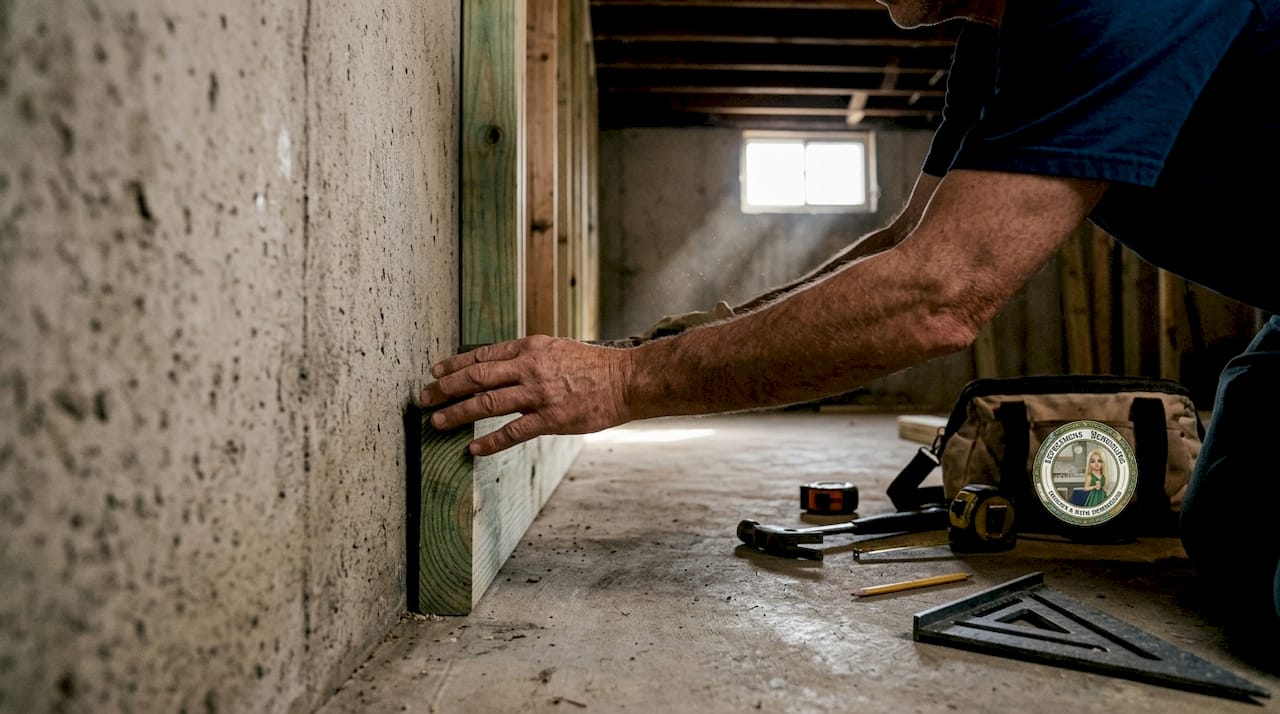
The fix is straightforward. Leave a half-inch to one-inch air gap between your framing and the concrete foundation wall. You can achieve this by using a pressure-treated bottom plate and standing your stud wall slightly away from the concrete. This small gap dramatically reduces moisture transfer.
Fireblocking is the other framing requirement most homeowners overlook. Building codes require fireblocking at specific intervals in wall cavities to slow the spread of fire. Your inspector will check for this. Missing fireblocking is a common reason basement rough-in inspections fail.
Pro Tip: Use pressure-treated lumber for any framing member that contacts concrete or sits within six inches of the floor. Standard kiln-dried lumber will absorb moisture and degrade over time in a basement environment.
4. Choose the right insulation for basement walls
Insulation choice in a basement is not just about R-value. It is about vapor control. The wrong insulation type creates a hidden moisture trap that destroys your walls from the inside out.
Rigid foam board insulation with a perm rating below 1.0 is the correct choice for foundation walls. It acts as both insulation and a vapor retarder, preventing warm interior air from reaching the cold concrete surface where it would condense. Closed-cell spray foam offers the same dual benefit at a higher cost per square foot, but it eliminates the need for a separate vapor barrier entirely.
Fiberglass batt insulation against concrete is a mistake. Fiberglass holds moisture rather than repelling it. Once it gets wet, it loses R-value and becomes a breeding ground for mold. The only place fiberglass batts belong in a basement is between interior partition walls, away from any concrete surface.
A quick comparison of the three main insulation options for basement walls:
| Insulation type | Vapor control | Moisture risk | Relative cost |
|---|---|---|---|
| Rigid foam board | Yes (perm below 1.0) | Low | Moderate |
| Closed-cell spray foam | Yes (built-in barrier) | Very low | High |
| Fiberglass batts | No | High against concrete | Low |
5. Complete all rough-ins before drywall
Electrical and plumbing rough-ins must be finished and inspected before a single sheet of drywall goes up. This is not just a code requirement. It is the only way to avoid tearing out finished walls later to fix something behind them.
Performing rough-ins before drywall installation prevents patchwork repairs and inspection failures. Rough-in work includes running all electrical circuits, installing outlet and switch boxes, running any new plumbing supply and drain lines, and completing HVAC ductwork extensions. Each of these trades needs to be inspected and approved before you close up the walls.
A Manual J load calculation is required before extending ductwork into a finished basement. This calculation determines whether your existing HVAC system has the capacity to heat and cool the new space. Skipping it leads to an undersized system that runs constantly and still leaves the basement uncomfortable.
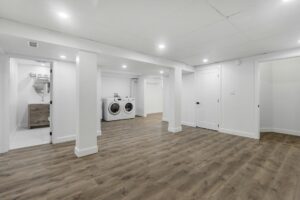
6. Select durable finishing materials built for basements
Standard building materials fail faster in basements because of the humidity. Every material choice you make should account for the fact that basements run cooler and damper than above-grade living areas.
For drywall, use moisture-resistant panels throughout. Setting-type compound, called hot mud, should be used for the first two coats in humid basement environments. Hot mud cures through a chemical reaction rather than drying, so humidity does not slow it down or weaken the bond. Leave a half-inch gap between the drywall bottom edge and the concrete floor to prevent moisture wicking up into the panel.
For ceilings, suspended ceiling systems give you access to plumbing, electrical, and HVAC lines running overhead without tearing out finished material. That access matters more than most homeowners realize until the first time a pipe needs attention. For flooring, luxury vinyl plank and porcelain tile both handle moisture well and hold up under heavy foot traffic.
Pro Tip: Choose low-VOC, mold-resistant paint in light colors for basement walls. Light colors compensate for the limited natural light most basements receive, and mold-resistant formulas add a meaningful layer of protection in humid conditions.
7. Understand how finished basements affect your appraisal
A finished basement adds real value to your home, but not in the way most homeowners expect. Under the ANSI Z765 standard, finished basements are excluded from Gross Living Area. Appraisers value them separately, typically at 50%–70% of the above-grade square footage rate.
That means a finished basement does not count the same as a finished bedroom upstairs. It adds value, but at a lower rate per square foot. The practical implication is that you should not overinvest in basement finishes expecting a dollar-for-dollar return. Focus on quality materials, proper permits, and functional layouts to maximize what you do recover.
Appraisers advise against combining basement square footage with above-grade square footage in any listing or disclosure. Doing so misleads buyers and creates delays during the appraisal process. List your basement square footage separately and accurately.
To maximize your appraisal outcome:
- Pull all permits and keep copies of inspection sign-offs
- Use quality finishes that match the style of the above-grade living areas
- Add an egress window if the basement will be used as a bedroom
- Document all work with photos and receipts for the appraiser
Key takeaways
Basement finishing succeeds when moisture control, proper permits, and moisture-resistant materials are treated as non-negotiable foundations, not optional upgrades.
| Point | Details |
|---|---|
| Moisture testing is first | Run the 48-hour plastic sheet test before framing or insulating any wall. |
| Permits protect your investment | Unpermitted work can void insurance coverage and block a future home sale. |
| Insulation choice determines wall health | Use rigid foam board or closed-cell spray foam on foundation walls, never fiberglass batts. |
| Rough-ins before drywall | Complete and inspect all electrical and plumbing before closing up any wall cavity. |
| Appraisals follow ANSI Z765 | Finished basements are valued at 50%–70% of above-grade rates, so prioritize quality over square footage. |
What I have learned from watching basements go wrong
I have seen more basement remodels than I can count, and the failures almost always trace back to the same two decisions: skipping the moisture test and hanging drywall before the electrical inspection.
The moisture test feels unnecessary when the basement looks dry. But concrete breathes. A basement that looks fine in july can show active vapor migration in november when ground temperatures drop. That plastic sheet test takes 48 hours and costs nothing. The mold remediation it prevents costs thousands.
The drywall-before-inspection mistake is almost always a scheduling pressure call. A homeowner wants to move faster, so they hang drywall before the inspector signs off on rough-in electrical. The inspector then requires them to cut access holes or remove panels entirely. I have watched that shortcut add two weeks and real money to projects that were supposed to be nearly done.
My honest advice on materials: do not cut costs on insulation or drywall. Those are the two places where a cheaper choice creates a problem you will not see for two or three years. By then, the mold is established and the repair is far more expensive than the upgrade would have been. Spend the money on moisture-resistant finishes upfront. You will not regret it.
Plan for maintenance access from day one. Suspended ceilings cost a little more than drywall ceilings, but the first time a plumber needs to reach a pipe, you will be grateful you made that call.
— Kierin
Expressions Remodeling can bring your basement vision to life
A finished basement is one of the highest-return projects a St. Louis homeowner can undertake, but only when it is done right. Expressions Remodeling handles every phase of the process, from moisture assessment and permit coordination to framing, insulation, and final finishes that hold up for decades.

Every Expressions Remodeling basement project includes complimentary 3D design so you can see the finished space before construction begins. The team manages permit applications and inspection scheduling, so nothing gets skipped. If you are ready to turn your basement into a functional, code-compliant living area, explore basement finishing options built around your budget and your home.
FAQ
What is the first step in finishing a basement?
Moisture testing is the first step. Tape plastic sheeting to the concrete floor and walls for 48 hours to detect vapor migration before any framing or insulation begins.
How long does a basement finish typically take?
A DIY basement finish typically takes 3–4 months on weekends, representing roughly 180–250 hours of active labor. Permits add one to three weeks to that timeline.
Does a finished basement count toward home square footage?
Under ANSI Z765, finished basements are excluded from Gross Living Area and valued separately at 50%–70% of the above-grade rate. Never combine basement square footage with above-grade square footage in a listing.
What insulation should I use on basement walls?
Use rigid foam board with a perm rating below 1.0 or closed-cell spray foam on foundation walls. Both control vapor effectively. Fiberglass batts trap moisture against concrete and should be avoided on any exterior basement wall.
Do I need permits to finish a basement?
Yes. Building, electrical, and plumbing permits are required in virtually every jurisdiction. Unpermitted basement work can affect homeowners insurance and complicate or block a future home sale.
Recommended
- Basement Finishing Ideas That Turn Underused Space Into the Best Room in the House – Expressions Remodeling
- St. Louis Basement Finishing: Quality-First, Budget-Smart Design – Expressions Remodeling
- Finish Your St. Louis Basement the Right Way: Dry, Healthy and Code-Compliant, with Complimentary 3D Design – Expressions Remodeling
- Elevate Your Home: Affordable Basement Finishing Tips – Expressions Remodeling